Friday

Group and Object Drawing

Modify>Group Ctrl+G

Group
This combines the Fill and Stroke of several objects as one.
Properties is Group

Open a New Document
Layer 1
  • Name ‘Stage’
  • Click Fill Color select Red
  • Click Oval (O)
  • Draw a circle
  • Change Fill Color to Yellow
  • Draw many small circles and ovals and place as hair on red circle
  • Change Fill Color to Black
  • Draw two smaller circles
  • Press/hold Ctrl
  • Select and move black circles to place as eyes on red circle
  • Deselect the black circle
  • Change Fill Color to Blue
  • Draw two small circle inside black eyes
  • Change Fill Color to Black
  • Click Pencil (Y)
  • Draw a mouth on red circle
  • Click Selection (V)
  • Select objects
  • Click Modify>Groups Ctrl+G
The Properties is Group and a defining box is around the object


Changing the Color of the Defining Box
  • Click Edit>Preference>Highlight color
  • Change color to Blue
  • Click Edit>Preference>Highlight color
  • Change color to Green


    Object Drawing (J)
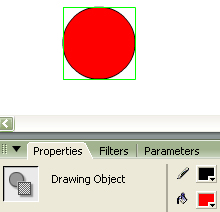
    The Paint Brush, Pencil, Pen, Oval, and Rectangle tools in Options have an Object Drawing icon
    Properties is Object Drawing.


    In Object Drawing mode each shape is created as a separate object that can be individually manipulate, similar to when an object is Group. Shapes can overlap other shapes on the same layer without altering their appearance if moved apart, reposition, or their appearance rearranged.

    The Stroke and Fill of a shape are not separate elements. Double click the object to ungroup the Fill and Stroke.

    Layer 1
    • Double click the Eraser to clear the Stage
    • Change Fill Color to Red
    • Click Oval (O)
    • Click Object Drawing (J)
    • Draw a circle
    A defining box appears around the circle. Properties is Object Drawing.


    • Press/hold Ctrl for Selection tool
    • Deselect the circle
    • Change Fill Color to Blue
    • Click Rectangle (R)
    •  Draw a square
    A defining box appears around the square. Properties is Object Drawing.
    Object Drawing stays selected between the tools until deselected.
    • Click Selection (V)
    • Move square over the circle
    • Deselect the square
    • Move circle from behind the square
    There is no cut out effect on the circle


    • Change Fill Color to Green
    • Change Stroke Color to Red
    Selected circle Fill changed to green and Stroke changed to red.


    • Double click green circle                              

    Time line has changed to Scene 1 and Drawing Object
    • Select the Fill
    • Move Fill outside of Stroke
    • Place pointer over the Stroke
    • Change the shape of the Stroke
    Properties is Shape and the Stroke and Fill behave independently


    • Click Scene 1
    • Place pointer over green circle and move so the Stroke is behind the square
    • Right click the circle
    • Select Arrange>Bring to Front
    Stroke and Fill have defining box around them as act as one object


    “Never discourage anyone who continually makes progress, no matter how slow.”
    Plato

    Thursday

    Library and Importing

    Window>Library   Ctrl+L

    The Library is a very import panel in Flash.

    The Library opens as a floating panel on the Work Area and can be docked

    The Library panel uses:
    • Symbols created in Flash are stored and organized.
    • Imported files, including bitmap graphics, sound files, and video are stored.
    • Organization of items in folders
    • Sort items by type
    • Show how often an item is used in a document

    Symbols
    • Items placed in the Library are symbols.
    • The symbol name can be changed by doubling clicking it.
    • The symbol can be dragged onto the Work Area many times
    • Convert to Symbol to place items from the Stage into the Library

    Note: When animating always animate symbols instead of animating raw graphics (graphics on Stage not stored in Library) or raw assets (an imported item to Stage).

    Basic/Main Library
    Create a Basic/Main Library with symbols that are use repeatedly saves file space. A circle and a square are examples of basic symbols to place in this library.


    Library and File Size
    Library Menu:
    • Select unused items: Highlights symbols that are not being used. Deleing unused items keeps the Library size smaller. Good to do at end of project.
    • Update Use Counts Now.  In the ‘Use Count’ area this shows how many times the symbol is used in the file. When there are lots of ‘1’ uses, check to see if that symbol can be replaced with another one from the Library to decrease file size.

    Panel:
    • Pin Current Library: Keeps that Library open when changing Documents.
    • Menu: Library menu
    • New Library Panel: Makes a duplicate copy of Library
    • Play Icons: Appear when an item has an action.
    • Toggle Sorting Order: Changes order of items in Library up or down
    • Wide/Narrow Library View: Viewing area of Library
    • Preview Window: Shows items highlighted
    • New Symbol: Open Convert of Symbol
    • New Folder: Opens new folder under Name
    • Properties: Opens Symbol Properties
    • Delete: Remove highlighted item
    • Icon: Different icons for sound, button, etc
    • Name
    • Type
    • Use Count: Usage of each symbol
    • Linkage
    • Date Modified


    Open a New Document
    Layer 1
    • Name ‘Stage’
    • Click Fill Color select Red
    • Click Oval (O)
    • Draw a circle
    • Click Window>Library Ctrl+L
    • Click Selection (V)
    • Select the circle
    • Click Modify>Convert to Symbol
    • Name ‘Circle’
    • Select Graphic>OK
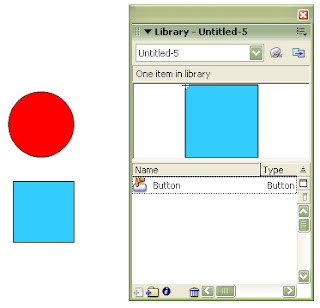
    The circle is placed in the Library as a symbol

    Open a New Document
    Layer 1
    • Name ‘Stage’
    • Click Fill Color select Blue
    • Click Rectangle (R)
    • Draw a square
    • Click Selection (V)
    • Select the square
    • Click Modify>Convert to Symbol
    • Name ‘Button’
    • Select Button>OK
    The square is placed in the Library as a symbol
    • Click Pin Current Library

    Open the Circle Document
    • Drag blue ‘Button’ onto Stage
    Button Library is opened and items from that Library can be used in other documents


    Open Button Document
    • Click Pin Current Library to deselect
    Open Circle Document
    Circle Library has two items, a Button and Circle


    • Click New Library Panel
    A duplicate copy of Library is placed on the Stage


    • Click red X to Close duplicate Library
    • Click Toggle Sorting Order
    Order of items in Library has change. Circle is listed first, Button second.


    • Click Wide and Narrow Library View:
    Wide View expands Library 


    • Click New Folder
     An untitled folder is placed in the Library
    • Hold/drag circle into folder
    • Double click to open or close the folder
    • Hold/drag circle out of folder


    Folder Uses:
    • Create a separate folder for each Scene
    • Create folders for symbol types, such as buttons, sounds, or bitmap imports.
    • Store all symbols or graphics that relate to a specific element (such as a logo or an animated element) together in one folder.

    Deleting
    • Click folder icon
    • Press Delete
    The folder is removed from the Library

    Import
    Files can be imported from any folder on your computer.

    Good Idea: Change the file size to the size of the Stage or smaller before importing.

    Flash files can not be imported into another flash file (extension .fla )

    File>Import.
    • Import to Stage                        Ctrl+R
    • Import to Library
    • Open External Library Ctrl+Shift+O
    • Import Video

    Import to Stage:
    • Opens the last used folder.
    • Imports to the Stage only.
    • Use to see how a project looks before importing to the Library.

    Import to Library:
    • File is placed in the opened Library.

    Open External Library:
    • Opens other Flash libraries where .fla files are.
    • Several libraries can be opened at the same time.

    Import Video
    • Opens a file from your computer or internet

    Pictures and Sound
    Pictures and sound files are imported as above into an opened Library.

    Common Libraries
    These libraries contain pre-built clips (self-contained, pre-constructed Flash documents) that can be added to your animations by dragging them to the Stage/

    Window>Common Libraries
    • Button: Customizable push buttons.
    • Classes: Compiled Clips lets you transfer information between you animation and server-side programs at runtime. Experienced programmers
    • Learning Interactions: Customizable components designed for creating Flash tutorials, including fill-in-the-blank, multiple choice, and true/false.

    Wednesday

    Graphics and Symbols

    GRAPHICS
    Flash works with two types of graphics:
    • Vector
    • Bitmap

    Vector: A set of computer instructions (lines or curves) determining the creation of geometric shapes as opposed to images made up of pixels.

    The lines on a Vector image are smooth and very clear.


    Vector image uses basic geometric shapes, like rectangles, lines, circles, ellipses and polygons instead of pixels to create a graphic image. The vector graphic contains data, like the starting point (pixel) of the object, what kind of object it is, its size and color.

    Vector graphics can be moved, resized and color change without losing any quality. Unlike bitmaps, vector graphics are not dependent on resolution.

    Vector graphics are also called ‘object oriented’.

    When the image is rasterized, the vector information is converted into a bitmap using RIP (Raster Image Processor).

    Once a vector image has been rasterized, it is best not to scale it more than 5 to 10% up or down.

    Rasterizing
    Raster graphics image or bitmap is a dot matrix data structure representing a generally rectangular grid of pixels, or points of color, viewable via a monitor, printer or other display mediums.

    Rasterizing: The task of taking an image described in a vector graphics format (shapes) and converting it into a raster image (pixels or dots) for output on a video display or printer, or for storage in a bitmap file format.

    Rasterizing reduces resolution.

    Bitmap: A pixel-by-pixel description of an image. Each pixel is a separate element.

    Bitmap is also referred to as a ‘Raster image’.

    Bitmap edges are jagged.


    Bitmapped: An image, which is formed by collection of square pixels in a rectangular format. The more bits per pixel the smoother the final image will be. (16-bit image or 16 bits per pixel. 24-bit image or 24 bits per pixel, etc) (Bit is a digit with any two-value attribute. 0 and 1 or +/- or yes/no or on/off)

    Bitmap image: Images created or captured as a grid of colored pixels. Because a bitmap image contains a finite number of pixels, the way a bitmap image looks is affected by its resolution. A scaled up bitmap image will lose detail and quality.

    Bitmap/Raster graphics are more practical than vector graphics for photographs and photo-realistic images. Vector graphics often serve better for typesetting or for graphic design.

    Bitmap graphics refer to not only the .bmp extension but all images stored in a bitmap format including .gif, .jpg, and .png for example.

    File size
    Convert to Vector reduces the file size but only in cases where the image doesn’t contain a lot of different colors or gradients.

    Importing Bitmaps:
    Scale bitmap closer to Stage dimensions before importing to lower file size.


    SYMBOL

    Symbol is either a:

    ·        Graphic

    ·        Button

    ·        Movie clip.

    A symbol includes imported artwork

    Graphic images converted to symbols appear in the Library and can be reuse in current project or other projects and documents.


    File Size:
    ·        Symbols dramatically reduces the file size.
    ·        Saving several instances of a symbol requires much less storage space than saving multiple copies of a graphic.
    ·        Converting static graphics, such as background images, into symbols and reusing them can reduce the file size.
    ·        Using symbols also speeds SWF file playback because each symbol is downloaded to Flash Player only once.

    SWF extension mean ‘Shockwave Flash’ file.

    Instance (Symbol Instance)
    • Each copy of a symbol placed on the Work Area or Stage is called an instance.
    • Each instance moves independently of each other and can be treated as a separate object.
    • Each instance can be skew, rotate, or scale without affecting the symbol itself.
    • An instance can be nested inside another symbol.
    • An instance can change how it behaves (for example, changing a graphic to a movie clip) and specify how an animation plays inside a graphic instance.
    ·        Each instance has its own properties that are separate from the symbol.
    ·        Each instance can change its tint, transparency, brightness and Alpha
    The properties of an instance are saved with it. If you edit a symbol or swap an instance to a different symbol, any instance properties changed still apply to the instance.

    Note:  When a symbol is updated all instances of that symbol are automatically updated. This makes it easy to make significant updates to an entire project.

    Instance Properties of a Button or Movie Clip: Select an instance on the Stage and enter a name in <Instance Name>. The name you assign to a movie clip or button instance can then be used in ActionScript so the instance can be manipulated or change its properties.


    Note: Because you cannot assign instance names to Graphic symbols, you cannot control them with ActionScript. 


    ActionScript is the scripting language used in Adobe Flash Professional to control playback of SWFs at runtime in Adobe Flash Player.
     
    Modify>Convert to Symbol
    Name: Symbol
    Type:
    • Movie clip
    • Button
    • Graphic
    Registration:

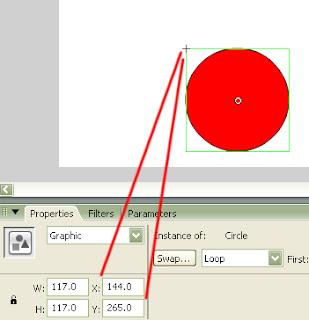
    ·        The registration point is the default location of an object from which an object's horizontal and vertical (x,y) co-ordinates are determined. It is the little crosshair that appears when an object is converted to a symbol.

    ·        The registration point is used with ActionScript as a point of reference when the symbol needs to be moved/rotated.

    Advance/Basic

    ·        For more options


    Open a New Document
    Layer 1
    • Name ‘Stage’
    • Lock layer
    Layer 2
    • Click Insert Layer
    • Name ‘Circle’
    • Click Fill Color select Red
    • Click Oval (O)
    • Draw a Circle
    • Window>Library Ctrl+L
    The Library opens as a floating panel on the Work Area
    • Click Selection (V)
    • Select the circle
    • Modify>Convert to Symbol
    • Name ‘Circle’
    • Select Graphic>OK
    Circle appears in the Library as a Graphic. Circle has a box around it on the Stage

                                             
    Layer 3
    • Click Insert Layer
    • Name ‘Button’
    • Change Fill Color to Blue
    • Click Oval (O)
    • Draw a circle
    • Click Selection (V)
    • Select the circle
    • Hold/drag circle to Library
    Convert to Symbol window appears.
    • Name ‘Button’
    • Select Button>OK
    Blue Circle appears in the Library as a Button


    Each instance has a box around it. Shapes do not.


    Registration


    Layer 2

    • Move red instance around the Stage
    Notice how the x and y location changes.
    • Click Show/Hide circle to hide blue button on the Stage


    Shape, Size, Color
    Layer 2
    • Click ‘Circle’ in Library
    • Hold/drag circle onto Stage
    There are two Graphic instances on the Stage
    • Click Free Transform (Q)
    • Change circle to an oval
    • Properties>Color>Tint
    • Change Tint to yellow
    • Change Percent slider to 50% to an orange oval
    • Click Color>Alpha
    The Fill color and Alpha can be changed along with the shape and size of a symbol


    Other Changes
    A symbol needs to be a shape for other changes
    • Click Selection (V)
    • Double click the oval
    Properties change from Graphic to Shape
    In Timeline, Circle appears next to Scene 1


    Color
    • In Properties
    • Change Fill Color to Rainbow
    • Change Stroke Color to Red
    • Change Stroke height to 10
    • Click Scene 1 to change back to Graphic

    Shadow Effect
    • Hold/drag a circle from the Library onto Stage
    • Properties>Color>Brightness
    • Change to minus -100%
    • Move black instance over rainbow instance
    • Right click instance
    • Select Arrange>Send to Back
    • Click rainbow instance
    • Move create shadow effect
    Using an instance from the Library instead of drawing another circle to create a shadow saves on file size


    Timeline
    Each instance contains its own Timeline.
    Layer 2
    • Select oval instance
    • Press Delete
    • Right click frame 10
    • Select Insert Frame
    • Double click an instance
    Circle Icon and instance name ‘Circle’ is added to Timeline
    Layer name changes to ‘Layer 1’ and Keyframe span changed to one.


    • Click Scene 1 to return to instance
    • Click Show/Hide circle to hide red circles on the Stage
    Layer 3
    • Click Show/Hide circle to reveal blue button on the Stage
    • Right click frame 10
    • Select Insert Frame
    • Double click instance
    Button Icon and instance name ‘Button’ is added to Timeline
    Button frames appear and Layer name changes to ‘Layer 1’

                              
    • Click Scene 1 to return to instance
     
    “Never discourage anyone who continually makes progress, no matter how slow.”
    Plato

    Sunday

    Cut, Copy, Paste, Clear

    Edit>
    • Cut                               Ctrl+X
    • Copy                            Ctrl+C
    • Paste in Center             Ctrl+V
    • Paste in Place               Ctrl+Shift+W
    • Paste Special
    • Clear                            Backspace

    Edit>Duplicate Ctrl+D

    Open a New Document

    Copy and Paste
    Layer 1
    • Name ‘Stage’
    • Lock Layer
    Layer 2
    • Click Insert Layer
    • Name ‘Circle’
    • Right Click frame 10
    • Insert Frame
    • Click Stroke Color select Black
    • Click Fill Color select Red
    • Click Oval (O)
    • Open Properties>Oval
    • Change Stroke height to 6
    • Draw a circle on the left side of Stage
    • Click Selection (V)
    • Right click inside Fill and select Copy
    • Right click and select Paste.
    A copy of the Fill is pasted in the center of the Stage
    • Move Fill copy to right side of Stage
    • Right click Stroke and select Copy
    • Right click and select Paste
    A copy of the Stroke is pasted in the center of the Stage
    • Move Stroke copy to right side of Stage
    • Double click the circle on the left of Stage to select the Fill and Stroke
    • Right click and select Copy
    • Right click and select Paste
    A copy of the Fill and Stroke are pasted in the center of the Stage


    ·        Double click Eraser to clear the Stage
    • Click Rectangle (R)
    • Draw a square on the left side of Stage
    • Right click the Fill and select Copy
    • Right click and select Paste.
    A copy of the Fill is pasted in the center of the Stage
    • Click Selection (V)
    • Move square copy to the right side of the Stage
    • Deselect the Fill
    • Change Fill Color to Blue
    • Click Oval (O)
    • Draw a circle below the square on the left side of Stage
    • Press shortcut Ctrl+C (copy) from keyboard
    • Press shortcut Ctrl+V (paste) from keyboard
    A red square is pasted in the center of the Stage
    Flash remembers the square paste command until another object is selected

                                      
    • Click Selection (V)
    • Double the blue circle to select the Fill and Stroke
    • Press shortcut Ctrl+C (copy) from keyboard
    • Press shortcut Ctrl+V (paste) from keyboard
    The Fill and Stroke circle are pasted in the center of the Stage

                                                          
    • Double click the Eraser to clear the Stage
    • Change Fill Color to Red
    • Click Oval (O)
    • Draw a circle on left side of the Stage
    • Right click inside Fill and select Copy
    • Edit>Paste in Place
    A copy of the Fill is pasted in front
    • Click Selection (V)
    • Move Fill copy to right side of the Stage
    • Double click circle on left side of the Stage
    • Right click and Copy
    • Edit>Paste in Place
    A copy of the Fill and Stroke are pasted in front
    • Move Fill and Stroke copy to right side of Stage
    • Double click Eraser to clear the Stage

    Shadow Effect
    • Click Fill Color select Black
    • Click Oval (O)
    • Draw a circle
    • Right click inside Fill and select Copy
    • Edit>Paste in Place
    • Change Fill Color to Yellow
    • Click Selection (V)
    • Move yellow circle to create a shadow
    • Double the Eraser to clear the Stage
                   
    Paste Special
    • Click Oval (O)
    • Draw a circle
    • Right click the Fill and select Copy
    • Edit>Paste Special
    • Device Independent Bitmap>OK
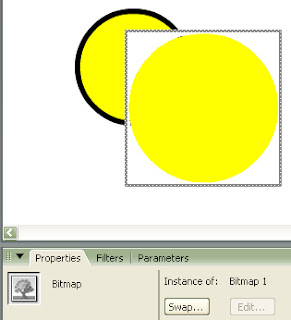
    • Properties>Bitmap (Tree Icon)
    The copy inside the box is in a fixed area. 


    • Click Selection (V)
    • Move Bitmap circle
    • Double Click the circle
    The bitmap copy can be moved but cannot be altered

    Cut
    • Double click the Eraser to clear the Stage
    • Click Oval (O)
    • Draw a circle
    • Draw a smaller circle inside
    • Right click small circle and select Cut
    • Right click Stage and select Documents Properties
    • Change Background color to Blue
     The larger circle has a hole in it.


    Clear
    • Double click the Erase to clear the Stage
    • Click Oval (O)
    • Draw a circle
    • Draw a smaller circle inside
    • Press/hold Ctrl
    • Select smaller circle Fill
    • Press Backspace
    The larger circle has a hole in it.

                                           
    • Press/hold Ctrl
    • Select the inside Stroke
    • Press Backspace
    The inside Stroke is removed

    Duplicate
    • Click Selection (V)
    • Double click circle
    • Edit>Duplicate Ctrl+D
    There is a duplicate copy of the circle


    Copy Object from One Layer to Another Layer
    Layer 3
    • Click Insert Layer
    • Name ‘Square’
    • Right Click frame 10
    • Insert Keyframe
    • Change Fill Color to Red
    • Click Rectangle (R)
    • Draw a square
    • Click Selection (V)
    • Right click frame 15
    • Insert Frame
    Keyframe Span 1 to 9 has no content. Keyframe Span 10 to 15 has content


    Layer 2
    • Click inside Keyframe Span
    • Deselect yellow circles
    • Double click one of the yellow circles
    • Right click circle and select Copy
    Layer 3
    • Click inside first Keyframe Span
    • Edit>Paste in Center
    • Move circle to right side of Stage
    • Move Playhead
    First Keyframe Span has yellow circle


    “Never discourage anyone who continually makes progress, no matter how slow.”
    Plato